What is a snood you may ask, well it is a tubular neck scarf, that can be pulled up to cover your head, just like a hood.
etsy
Making them out of chiffon and lightweight fabrics can be challenging, but I hope this tutorial will help you!
etsy
KrissysWonders Presents
Chiffon Snoods Made Easy
Supply list
1 yard of fabric (chiffon, silk, or lightweight cotton)
Cutting Mat (24” x 36”) You
can substitute a piece of cardboard, or make yourself a paper pattern. I prefer
the cardboard or cutting mat when using the chiffon, because it makes it easier
to handle the fabric, and to ensure that you get a “Squared up” piece of fabric
for your Snood. If you use a paper pattern, you will need to pin it to the
fabric, and the chiffon can shift and move, making it hard to cut the fabric
evenly.
Sewing machine (Sewing
machine needles for fine fabric) Thread, Scissors, Yard stick, Marking pen, or marking
utensil of choice
Definitions
Selvedge = the unusable edge of
the fabric, in this case, you will have two of them that will be opposite the fold
Ends of fabric = this will be
the edge of fabric that is 90 degrees opposite the folded and selvedge edge.
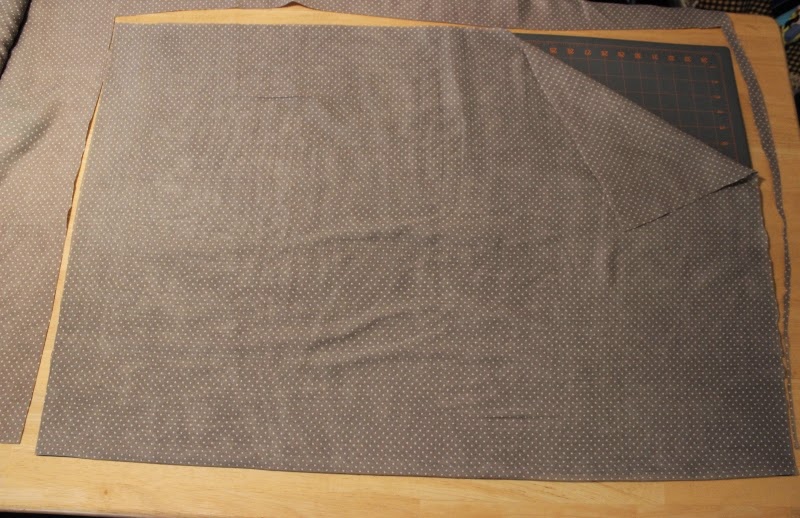
1. When using 45” wide fabric,
(instructions
for 60” wide or wider fabric is below) place the folded edge of
your fabric along the straight edge of your mat or cardboard horizontally, also
making sure that the selvedge is straight on the opposite side of the mat. Then
use the yard stick as a guide to mark a straight line with your marking pen or
utensil as in pic 1 & 2. Mark
and cut one end at a time, as it is important to “Square Up” both ends. If you have the cutting mat you can use the
measurement markings as a guide for the yard stick placement. (It is important
to have right sides of fabric together when “Squaring up” If you have to turn the fabric, do so before “Squaring up” your fabric. If you are
using the lightweight fabric, it will get air bubbles in it. Patting the fabric
gently and pushing softly will help you even out the fabric.)
Squaring up both ends of your fabric
is a most important first step. When you get your fabric cut at the store, it is
almost impossible for the attendant to get the ends square
for you. Keep your fabric folded and handle it as little as possible to keep it
from “MOVING”. Chiffon and super
lightweight fabric can move and shift, making it seem like you are trying to
catch mercury. OH!! The less you unfold and play with the fabric, the easier it
will be to “Square” it up, hence the
wrinkled fabric in the picture. You can iron out the wrinkles during the
construction process. (Yes…I love to play with my fabric) Once your fabric is
marked, gently and slowly cut the fabric, trying not to “MOVE” the fabric,


When using 60” wide or wider fabric,
place the folded edge along the straight edge of your mat or cardboard
horizontally. Let the end of the fabric dangle over the ends and the other side
of the cardboard or cutting mat. Gently place your scissors end under the
fabric at the right hand corner, or left hand corner if you are a lefty. With your scissors open, butt the edge of
your scissors next to the edge of the mat or cardboard, trying not to raise or
mess with the fabric, keeping it as level as possible so that it doesn’t
“MOVE”. Slowly start cutting the
fabric, using the edge of the mat or cardboard as a guide. Since you won’t be
able to see, you will be feeling your way around the mat with your scissors. It
sounds hard, but it is really easy.
2. Your fabric is “Squared up” now, and you may still have a
rough and messy looking edge, this is called the selvedge (pic 1 below) if you are using 45” wide fabric. The selvedge can
be bulky and cause pulling and bumpiness if you sew too close to it. Eliminate
this problem by marking the fabric, 1”- 1 ½” from the selvedge , you will be
trimming the selvedge off after it is sewn.
pic 1
pic 2
3. You will need to leave
an opening at each end. Place a pin 4” in on each side as pictured
below. Now you are ready to sew. Sew from one pin to the other pin, leaving the
ends open.
4. Carry the fabric gently
to the machine. Make sure to support your fabric. Don’t let it
dangle and swing in the breeze. Slowly sew
a scant 1/8” inside of the mark, especially if you used permanent ink like I
did. DUH! All hands and fingers need to be on deck holding the fabric in front,
behind, beside…making your fingers act like a spider, holding the fabric so that it doesn’t shift. The feed dogs on the sewing machine will grab
and push this lightweight fabric around, and it can be a little frustrating. Spider action is “KEY” to keep the fabric from “MOVING”
5. Trim the selvedge edge, including the area at the 4” opening. Please note the 4” opening area that has been left unsewn.
6. This next step is important!
You might need to “Square Up” the
ends of the fabric again, just exactly
as you did in step 1. The fabric will, and can move while it is being
sewn, and the ends may become uneven. You haven’t done anything wrong, it just
happens with this type of fabric sometimes. Lay the tube along the straight edge of the cardboard or mat, making sure that both
edges are strait, with the folded edge on one side, and the sewn on the other
side. You will then be able to tell if it has become uneven. Pic 1 Mark your
fabric, and cut off the uneven edge. Pic 2
The squared up end
7. Iron the seam to one side,
on a Synthetic setting only in the area that was sewn, no need to iron the
unsewn 4” opening. Turn the fabric, and then iron the seam again.
Take time now to iron out any other wrinkles that are in the fabric.
You now have a nicely pressed tube that is turned right side out.

8. Fold the tube in half,
in the direction the arrows are pointing, meeting the unsewn edges of the tube.
Right sides will be facing each other while sewing. It will seem as if you are
looking down inside the tube while you are sewing.
Folded in half with right sides together
9. Pull back the top layer of fabric, and Meet the left corners
together as pictured. You can place a pin here while carrying it to
the machine, but no need to pin around the circle, because the tube will spiral
as you sew, and some of the pins will fall out…I know from experience. OUCH!


10. Next step can seem scary, but it is
really easy. Slowly start
sewing from the left corner, around the circumference of the tube to the right
corner, using your spider finger
action, (You are NOT sewing through 4 layers of fabric, only two) Sew
a few stitches at a time, pausing to bring the edges together after a few
stitches. Repeat the process again after a few stitches, pausing again and
bringing the edges together, sewing slowly….repeat, repeat. While you are
sewing around the circumference of the tube ends, it may turn back to the
original inside out, but don’t worry, there will be that 4” opening for you to
pull it back through. (Sorry I can only show one hand executing the spider action…I had to take the picture
with my right hand)
11. The picture below shows that when you
are finished sewing, the edges may not be even. No worries as long
as your seam width is still ½”, and if there isn’t a large amount of difference,
it will be tucked inside, and you won’t ever see it.
12. You are just about finished!!!
Pull the scarf back through the opening if needed. When your snood is turned
right side out, fold the edges of the seam, to the inside and pin in place.
13. Sew the opening closed
with an edge stitch. You can hand sew this area if you like, but if
the thread matches, it doesn’t make much difference.
14. Iron the edge stitched
seam to one side, and then iron the rest of the seam. You are
finished!! The tube may be tall, go ahead and put it over your head, and drape it in
place around your neck, and fluff a little. You can always pull this up
over your head as a hood when it is raining or snowing….or when you want to be
left alone!
Your finished Snood!!
This
pattern is protected by copyright© KrissysWonders 2014. Do not sell, alter, or
redistribute this pattern in any way or form. You have my permission to sell
your finished product, but you are responsible for the finished product. I ask
that you please link back to me the designer at www.krissyswonders/etsy.com
I hope you enjoyed this Tutorial! Make sure to follow my blog, as
I will be posting new patterns in the future!
Photo Gallery
I hope you enjoyed my Snood Tutorial!!
I would love it if you would join me on my FB page.
KrissysWonders
Labels: Cowl, KrissysWonders, Scarf, sewing, Snood, Tutorial


