I recently viewed a set of crocheted pumpkins on the web that were absolutely gorgeous! Unfortunately there was a language barrier that google translator wasn't able to help with. So I wrote a pattern for myself, and for you!

A friend encouraged me to figure out how to make these pumpkins, and WOW!!! I could not quit making them. New designs kept swirling around in my head!!!!
Modern colors, Traditional colors.....
Shabby colors.....
And the embellishments....oh my mind was spinning, and I am afraid it hasn't stopped!
I LOVE them plain, and if you have modern decor, the gray and mustard pumpkins are perfect!
Adding other dark colors to the gray set looks wonderful!!!
Adding embellishments can add a country look to the dark pumpkins!
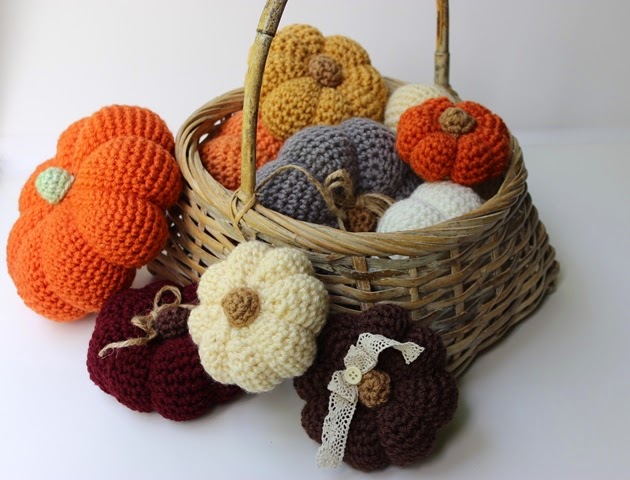
Putting a big pile of pumpkins together, in every different color and embellishment is fun too!!
I LOVE THESE PUMPKINS!!!
Pretty Pumpkins!!!
Any Worsted weight yarn in colors desired Red Heart super saver or Hobby
Lobby’s “I Love This Yarn”
Pattern
Notes: SC DEC = crochet 2 sc together = in nxt
st, insert hook pull up loop, in nxt st, insert hook pull up loop, 3 loops on
hook, yarn over, pull through all 3 loops on hook
Notions List: Yarn Needle, Polyester Fiber Fill or
Stuffing Material of Your Choice
Cute embellishments: These little pumpkins can be plain or embellished with
bows, beads, fabric or raffia, maybe a piece of vintage jewelry, buttons, lace,
anything….they are so cute!
Hook Sizes
H–8/5 mm = Pumpkin body
I-9/5.5= Stem
Stitch Key
SC= single crochet
CH = chain
SLP ST = slip stitch
SP = space
nxt = next
beg. = beginning
st = stitch
SC DEC= crochet 2 SC together; in nxt st, insert hook, pull up loop, in
nxt st, insert hook, pull up loop, 3 loops on hook, yarn over, pull through all
loops on hook
repeat between * * = repeat the sequence that is
between the * * as many times as stated
x = times, will follow number,
example repeat sequence 8 x or 8 times
Itty Bitty Pumpkin “H” hook

Round 1: CH 2, SC 7x in 2nd CH from hook, join
with SLP ST to beg. SC. (You will bypass Beg. CH 1, and it will recede to the
back of work, making the seam less noticeable)
Round 2: CH 1, 2 SC in
joining st, 2 SC in nxt st, and in each st around; join with SLP ST to beg. SC (14 SC)
Round 3: CH 1, SC in joining st, 2 SC in nxt st; *SC in nxt st, 2 SC in nxt st*
Repeat
between * * 5 more x ;
join w/SLP ST in top of first SC made (21 SC)
Round 4: CH 1, SC in joining st, SC in nxt st, 2 SC in nxt st; *SC in nxt st (2x), 2 SC in nxt st* Repeat
between * * 5 more x; join
w/SLP ST in top of first SC made (28 SC)
Round 5: CH 1, SC in joining st, SC in nxt st (2x), 2 SC in nxt st; *SC in nxt st (3x), 2 SC in nxt st* Repeat between
* * 5 more x; join w/SLP
ST in top of first SC made (35 SC)
Round 6 - 11: CH 1, SC in joining st, and in each st around; join w/SLP
ST in top of first SC made (35 SC)
Note, if you would like a taller pumpkin, add more rows here….just crochet until
you are content. One of my testers added HDC rows at this point, to get the
height she wanted.
Decrease rows follow, you may start
stuffing your pumpkin at this point, but there will be an opening at the end to
finish stuffing your pumpkin. You will close the hole after stuffing is
complete.
Round 12: CH 1, SC in joining st, SC in nxt st (2 x), SC DEC;
*SC in nxt st (3x), SC DEC* Repeat between *
* 5 more x; join w/SLP
ST in top of first SC made (28 SC)
Round 13: CH 1, SC in joining st, SC in nxt st, SC DEC; *SC in nxt st (2x), SC
DEC* Repeat
between * * 5 more x; join
w/SLP ST in top of first SC made (21 SC)
Round 14: CH 1, SC in joining st, SC DEC; *SC in nxt st, SC DEC* Repeat
between * * 5 more x; join
w/SLP ST in top of first SC made (14 SC)
Round 15: CH 1, SC DEC in joining st; *SC
DEC* Repeat
between * * 5 more x; join w/slp st in top of first SC
made, end off by pulling yarn through last st made, leaving a 36” to 42” tail
for sewing through the center and around the pumpkin, picture tutorial will be
at the end of the pattern (7 SC)
Stem “I” Hook
Round 1: CH 2, SC 5x in 2nd CH from hook, join with
SLP ST to beg. SC
Round 2: CH 1, SC in
joining st; 2 SC in nxt st; SC in nxt st; 2 SC in nxt st; SC in last st: join
with SLP ST to beg. sc (7SC)
Round 3: CH 1, SC in joining st and in each st around, join w/ SLP ST to beg.
SC (7 SC)
You can add another row here if you would like a taller stem.
Next, take the beginning tail and the ending tail, and tie them together,
pulling the beginning tail just enough to flatten out and shape the top of your
stem.
Then stuff the yarn ends back up inside, and glue the stem
onto the pumpkin.
You can stuff the stem with polyfil, and sew it on if you
would like. Although I glued a stem to a pumpkin and when I didn’t like the
color, I thought it could be pulled off. Nope!! It would not come off without tearing up the pumpkin…so hot glue and yarn, go well together…who knew?
Medium
Pumpkin “H” Hook

Round 1: CH 2, SC 7x in 2nd CH from hook, join
with SLP ST to beg. SC. (You will bypass Beg. CH 1, and it will recede to the
back of work, making the seam less noticeable)
Round 2: CH 1, 2 SC in
joining st, 2 SC in nxt st, and in each st around; join with SLP ST to beg. SC (14 SC)
Round 3: CH 1, SC in joining st, 2 SC in nxt st; *SC in nxt st, 2 SC in nxt st*
Repeat
between * *
5 more x ; join w/SLP ST in top of first SC made (21 SC)
Round 4: CH 1, SC in joining st, SC in nxt st, 2 SC in nxt st; *SC in nxt st (2x), 2 SC in nxt st* Repeat
between * * 5 more x; join
w/SLP ST in top of first SC made (28 SC)
Round 5: CH 1, SC in joining st, SC in nxt st (2x), 2 SC in nxt st; *SC in nxt st (3x), 2 SC in nxt st* Repeat
between * * 5 more x; join
w/SLP ST in top of first SC made (35 SC)
Round 6: CH 1, SC in joining st, SC in nxt st (3x), 2 SC in nxt st; *SC in nxt st (4x), 2 SC in nxt st* Repeat
between * * 5 more x; join
w/SLP ST in top of first SC made (42 SC)
Round 7: CH 1, SC in joining st, SC in nxt st (4x), 2 SC in nxt st; *SC in nxt st (5x), 2 SC in nxt st* Repeat
between * * 5 more x; join
w/SLP ST in top of first SC made (49 SC)
Round 8 - 16: CH 1, SC in joining st, and in each st around; join w/slp
st in top of first SC made (49 SC)
Note, if you would like a taller pumpkin, add more rows here….just crochet
until you are content. One of my testers added HDC rows at this point, to get the
height she wanted.
Decrease rows follow,
you may start stuffing your pumpkin at this point, but there will be an opening
at the end to finish stuffing your pumpkin. You will close the hole after
stuffing is complete.
Round 17: CH 1, SC in joining st, SC in nxt st (4 x), SC
DEC; *SC in nxt st (5x), SC DEC* 5 more x; join w/SLP ST in top of first SC
made (42 SC)
Round 18: CH 1, SC in joining st, SC in nxt st (3 x), SC DEC; *SC in nxt st
(4x), SC DEC* Repeat between * * 5 more x; join w/SLP ST in top of first SC
made (35 SC)
Round 19: CH 1, SC in joining st, SC in nxt st (2 x), SC DEC; *SC in nxt st (3x),
SC DEC* Repeat between * * 5 more x; join w/SLP ST in top of first SC
made (28 SC)
Round 20: CH 1, SC in joining st, SC in nxt st; SC DEC; *SC in nxt st (2x), SC
DEC* Repeat
between * * 5 more x; join
w/SLP ST in top of first SC made (21 SC)
Round 21: CH 1, SC in joining st, SC DEC; *SC in nxt st, SC DEC* Repeat
between * * 5 more x; join
w/SLP ST in top of first SC made (14 SC)
Round 22: CH 1, SC DEC in joining st; *SC
DEC* Repeat
between * * 5 more x; join
w/SLP ST in top of first SC made, end off by pulling yarn through last st made,
leaving a 2 ft. tail for sewing through the center and around the pumpkin,
picture tutorial will be at the end of the pattern (7 SC)
Stem “I” Hook
Round 1: CH 2, SC 5x in 2nd ch from hook, join with
SLP ST to beg. SC
Round 2: CH 1, SC in
joining st; 2 SC in nxt st; SC in nxt st; 2 SC in nxt st; SC in last st: join
with SLP ST to beg. SC (7 SC)
Round 3: CH 1, SC in joining st and in each st around, join w/ SLP ST to beg.
SC (7 SC)
You can add another row here if you would like a taller
stem.
Next, take the beginning tail and the ending tail, and tie
them together, pulling the beginning tail just enough to flatten out and shape
the top of your stem.
Then stuff the yarn ends back up inside, and glue the stem
onto the pumpkin.
You can stuff the stem with polyfil, and sew it on if you
would like. Although I glued a stem to a pumpkin and when I didn’t like the
color, I thought it could be pulled off. Nope!! It would not come off without tearing up the pumpkin…so hot glue and yarn, go well together…who knew?
Large Pumpkin “H” Hook

Round 1: CH 2, SC 7x in 2nd CH from hook, join
with SLP ST to beg. SC. (You will bypass Beg. CH 1, and it will recede to the
back of work, making the seam less noticeable)
Round 2: CH 1, 2 SC in
joining st, 2 SC in nxt st, and in each st around; join with SLP ST to beg. SC (14 SC)
Round 3: CH 1, SC in joining st, 2 SC in nxt st; *SC in nxt st, 2 SC in nxt st*
Repeat
between * *
5 more x ; join w/SLP ST in top of first SC made (21 SC)
Round 4: CH 1, SC in joining st, SC in nxt st, 2 SC in nxt st; *SC in nxt st (2x), 2 SC in nxt st* Repeat
between * * 5 more x; join
w/SLP ST in top of first SC made (28 SC)
Round 5: CH 1, SC in joining st, SC in nxt st (2x), 2 SC in nxt st; *SC in nxt st (3x), 2 SC in nxt st* Repeat
between * * 5 more x; join
w/SLP ST in top of first SC made (35 SC)
Round 6: CH 1, SC in joining st, SC in nxt st (3x), 2 SC in nxt st; *SC in nxt st (4x), 2 SC in nxt st* Repeat
between * * 5 more x; join
w/SLP ST in top of first SC made (42 SC)
Round 7: CH 1, SC in joining st, SC in nxt st (4x), 2 SC in nxt st; *SC in nxt st (5x), 2 SC in nxt st* Repeat
between * * 5 more x; join
w/SLP ST in top of first SC made (49 SC)
Round 8: CH 1, SC in joining st, SC in nxt st (5x), 2 SC in nxt st; *SC in nxt st (6x), 2 SC in nxt st* Repeat
between * * 5 more x; join
w/SLP ST in top of first SC made (56 SC)
Round 9: CH 1, SC in joining st, SC in nxt st (6x), 2 SC in nxt st; *SC in nxt st (7x), 2 SC in nxt st* Repeat
between * * 5 more x; join
w/SLP ST in top of first SC made (63 SC)
Round 10: CH 1, SC in joining st, SC in nxt st (7x), 2 SC in nxt st; *SC in nxt st (8x), 2 SC in nxt st* Repeat
between * * 5 more x; join w/SLP ST in top of first SC
made (70 SC)
Round 11- 20: CH 1, SC in joining st, and in each st around; join w/SLP
ST in top of first SC made (70 SC)
Note, if you would like a taller pumpkin, add more rows here….just crochet
until you are content. One of my testers added HDC rows at this point, to get the
height she wanted.
Decrease rows follow, you may start
stuffing your pumpkin at this point, but there will be an opening at the end to
finish stuffing your pumpkin. You will close the hole after stuffing is
complete.
Round 21: CH 1, SC in joining st, SC in nxt st (7 x), SC
DEC; *SC in nxt st (8x), SC DEC* Repeat between * * 5 more x; join w/slp st in
top of first SC made (63 SC)
Round 22: CH 1, SC in joining st, SC in nxt st (6 x), SC DEC; *SC in nxt st
(7x), SC DEC* Repeat between * *
5 more x; join w/SLP ST in top of first SC made (56 SC)
Round 23: CH 1, SC in joining st, SC in nxt st (5 x), SC DEC; *SC in nxt st
(6x), SC DEC* Repeat between * *
5 more x; join w/SLP ST in top of first SC made (49 SC)
Round 24: CH 1, SC in joining st, SC in nxt st (4 x), SC DEC; *SC in nxt st
(5x), SC DEC* Repeat between * *
5 more x; join w/SLP ST in top of first SC made (42 SC)
Round 18: CH 1, SC in joining st, SC in nxt st (3 x), SC DEC; *SC in nxt st
(4x), SC DEC* Repeat between * *
5 more x; join w/SLP ST in top of first SC made (35 SC)
Round 19: CH 1, SC in joining st, SC in nxt st (2 x), SC DEC; *SC in nxt st
(3x), SC DEC* Repeat between * *
5 more x; join w/SLP ST in top of first SC made (28 SC)
Round 20: CH 1, SC in joining st, SC in nxt st; SC DEC; *SC in nxt st (2x), SC
DEC* Repeat
between * * 5 more x; join
w/SLP ST in top of first SC made (21 SC)
Round 21: CH 1, SC in joining st, SC DEC; *SC in nxt st, SC DEC* 5 more x; join
w/SLP ST in top of first SC made (14 SC)
Round 22: CH 1, SC DEC in joining st; *SC
DEC* 5 more x; join w/SLP ST in top of first SC made, end off by pulling yarn
through last st made, leaving a 2 ½ ft. tail for sewing through the center and
around the pumpkin. picture tutorial will be at the end of the pattern (7 SC)
Stem “I” Hook
Round 1: CH 2, SC 5x in 2nd CH from hook, join with
slp st to beg. SC
Round 2: CH 1, SC in
joining st; 2 SC in nxt st; SC in nxt st; 2 SC in nxt st; SC in last st: join
w/SLP ST to beg. SC (7 SC)
Round 3: CH 1, SC in joining st and in each st around, join w/SLP to beg. SC (7
SC)
You can add another row here if you would like a taller stem.
Next take the beginning tail and the ending tail, and tie
them together, pulling the beginning tail just enough to flatten out and shape
the top of your stem.
Then stuff the yarn ends back up inside, and glue the stem
onto the pumpkin.
You can stuff the stem with polyfil, and sew it on if you
would like. Although I glued a stem to a pumpkin and when I didn’t like the
color, I thought it could be pulled off. Nope!! It would not come off of there
without tearing up the pumpkin…so hot glue and yarn, go well together…who knew?
Tutorial on
pumpkin shaping
Start stuffing and shaping your pumpkin.
You will need to close this hole up, once the pumpkin is stuffed to the firmness
that you desire. (I like my pumpkins semi-firm. IMPORTANT NOTE: Use your finger to poke a hole through the center
of the stuffing, so your needle can go through without getting stuck on your
stuffing)
Insert the hook in the stitch closest to ending stitch.
Using the yarn tail, draw up a loop.
Then begin to SC DEC around the opening.
Close the hole by joining with a SLP ST to the opposite
side, and pull the yarn through to finish closing the hole. This is the bottom
of your pumpkin. You will have a very long tail of yarn.
Thread your tail into
the yarn needle, insert the needle in the center
Push the needle through
the center to the opposite side or "the top" of your pumpkin, pulling the yarn
through the center of pumpkin, making a dent.
The first dent sequence,
will dent ½ of the pumpkin. You do this by wrapping the yarn completely around
the pumpkin, coming back to the top, making sure your pumpkin is halved and evenly
dented.
Insert your needle back
into the center hole.
Go completely through
and out the center bottom of the pumpkin, pulling and shaping to make the dents
secure.
Continue passing through the middle of your pumpkin, pulling and wrapping your
yarn, to make the dents.
I use the clock method of shaping, 12 to 6, 3 to 9 and so on..
Until your are happy
with your pumpkin, and tie off and secure your yarn end at the bottom.
If you have enough yarn left, you can
back over your dents one more time. Then sew your stem in the dent at the top
of the pumpkin, or use hot glue…I like hot glue!
And then embellish to your hearts content!!!
This pattern is protected by copyright© KrissysWonders 2014. Do not
sell,
alter,
or redistribute this pattern in any way or form. You have my
permission
to sell your finished product, but you are responsible for the
finished
product.
Labels: Crafting, Crochet Patterns, Crochet Pumpkin, Crocheted Pumpkin, DIY, Free Crochet Pattern, Free Crochet Patterns, KrissysWonders, Pink Pumpkin, Shabby Chic Pumpkin